

LabX EU Withdrawal guide · Widget & form
Style the withdrawal form and floating button
In short
Open Widget & form > Appearance to pick one of four design templates (Clean, Minimal, Bold, Rounded), choose between Step by step or One continuous page flow, set brand colors and border radii, and configure the floating button's visibility, icon, label, colors, and screen position.
The Appearance tab in Widget & form controls both the visual styling of the withdrawal form and the design of the floating storefront button.
Step 1: Choose a template, flow layout, and form colors
Open Widget & form and click the Appearance tab:
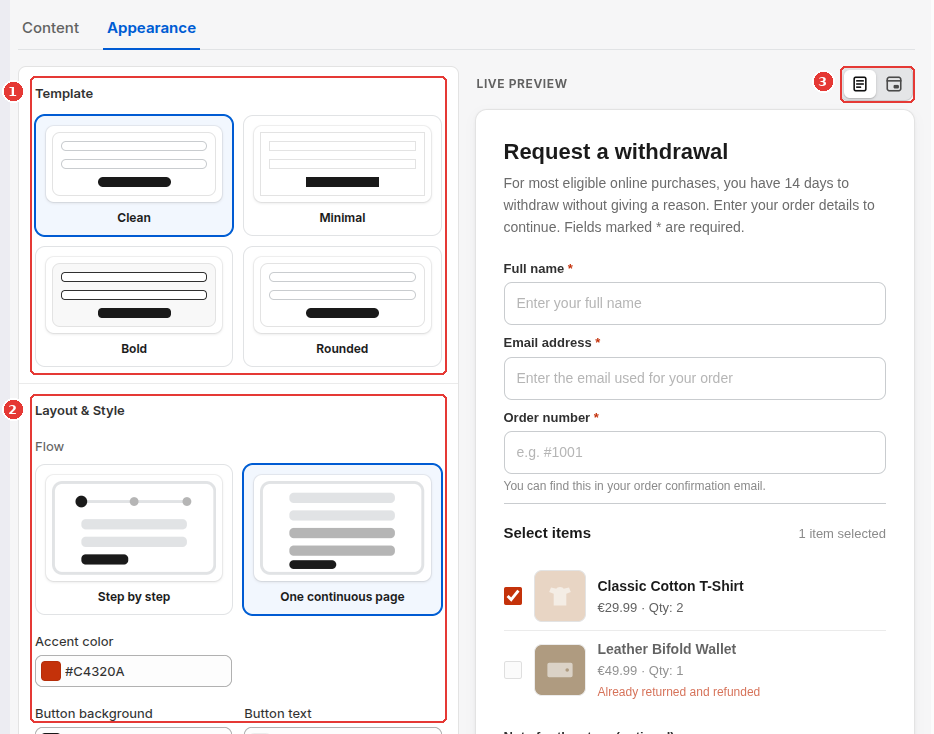
- Under Template (1), choose one of the four visual presets: Clean, Minimal, Bold, or Rounded.
- Under Layout & Style (2):
- Choose the Flow: Step by step (multi-step wizard) or One continuous page.
- Set your Accent color, Button background, Button text, Form background, Input border, Input border radius, and Card border radius.
- Use the Preview display mode toggle at the top right of the Live Preview (3) to switch between previewing the Form and previewing the Floating button.
Step 2: Customize the floating button style and position
Scroll down on the Appearance tab to the Floating button section:
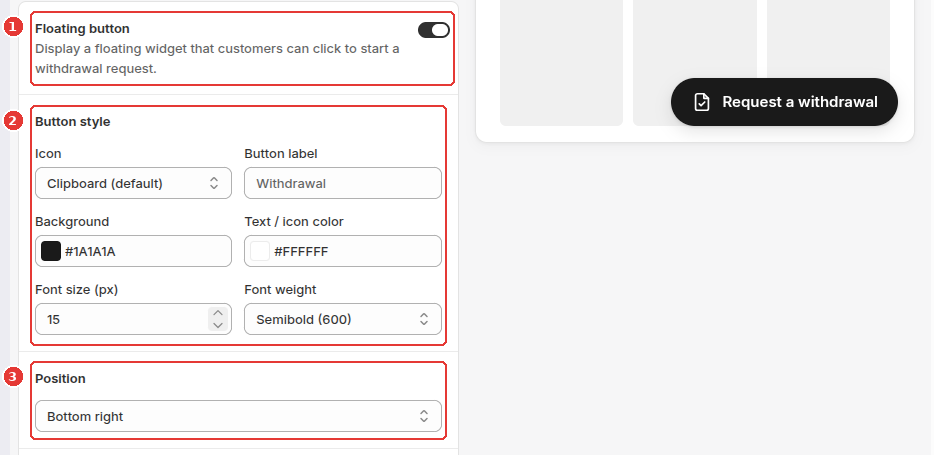
- Check or uncheck Show floating button (1) to control whether the floating launcher pill appears on your storefront.
- Under Button style (2), choose an Icon (
Clipboard (default),Shield,Return arrow, orChat bubble), enter a custom Button label, and set the Background color, Text / icon color, Font size (px), and Font weight. - Under Position (3), choose Bottom right or Bottom left, then click Save.
Frequently asked questions
What is the difference between Step by step and One continuous page?
Step by step guides the shopper through distinct screens (Find order, Choose items, Confirm, Receipt). One continuous page presents the order lookup, item selection, and confirmation in a single vertical flow.
How can I preview the floating button before saving?
Use the Preview display mode buttons in the top-right corner of the Live Preview panel to switch between Form preview and Floating button preview.
Still need help?
Our developers answer support directly. Email [email protected] or reach out through our contact page.