

LabX Fraud Filter guide · Checkout & bots
Enforce server-side checkout rules with Shopify Functions
In short
Open Checkout Protection and click Add rule to enforce rules on Shopify's servers during checkout. Match buyers by Email, Phone, Name, Country, Zip, or Customer tag, set a custom error message, and choose whether the error appears at the top of checkout or beside the matching field.
While storefront Blocking Rules run in the visitor’s browser, Checkout Protection runs as a Shopify Function (Cart and Checkout Validation) on Shopify’s own servers. Even if a buyer disables JavaScript or jumps straight to checkout via a direct permalink, Shopify evaluates your checkout rules before the order can be placed.
Step 1: View and add checkout protection rules
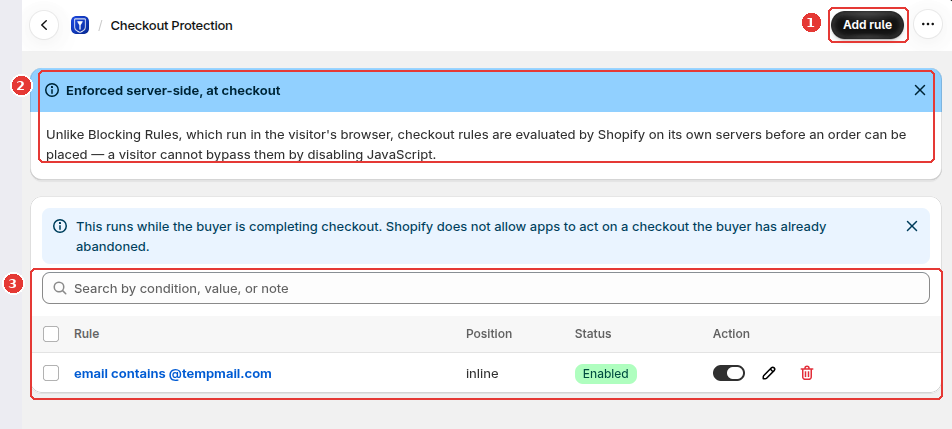
Open Checkout Protection in the app menu:
- Click Add rule in the top-right corner (1) to create a new server-side checkout rule.
- Review the server-side enforcement notice (2), which explains how checkout rules complement browser-based blocking rules.
- Manage your existing checkout rules in the table below (3) — search rules, see whether the error is displayed
inlineor at the top of checkout, and toggle, edit, or delete any rule.
Step 2: Set the If condition and preview the checkout error
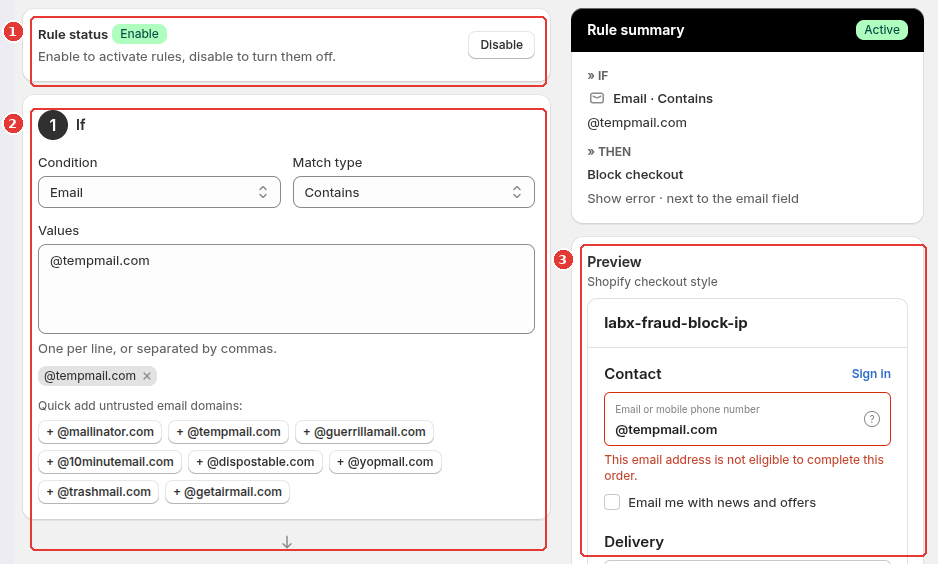
In the checkout rule builder:
- Confirm Rule status is active at the top (1).
- In the If card (2), choose a Condition (
Email,Phone,Name,Country,Zip, orCustomer tag), select the Match type (Exact matchorContains), and enter one or more Values (or click the quick-add disposable email domain chips such as+ @mailinator.comor+ @tempmail.com). - Check the live Preview on the right (3) to see exactly how the error appears inside a Shopify-style checkout form.
Step 3: Customize the Then error message and position
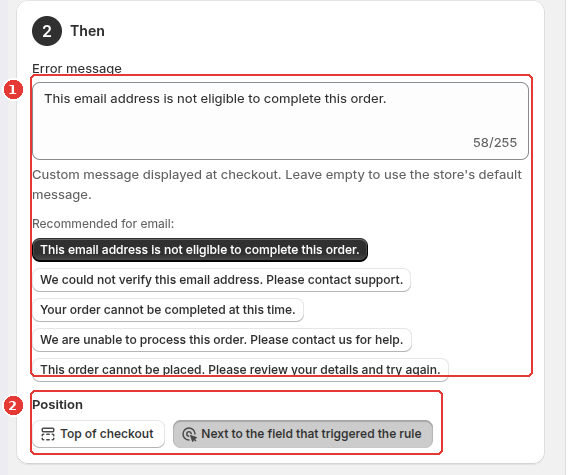
Scroll down to the Then card:
- Enter your Error message (up to 255 characters) or click one of the recommended message presets below the field (1).
- Choose the Position for the error banner (2): Top of checkout or Next to the field that triggered the rule, then click Save.
Frequently asked questions
Can a buyer bypass Checkout Protection by disabling JavaScript?
No. Unlike storefront Blocking Rules, Checkout Protection runs as a Shopify Cart and Checkout Validation Function on Shopify's own servers before an order can be completed.
Why does the Customer tag condition ask for an extra permission?
Matching against Shopify customer tags requires the optional read_customers permission. The app only requests this permission when you select Customer tag in a checkout rule.
Still need help?
Our developers answer support directly. Email [email protected] or reach out through our contact page.